Author Archives: %s

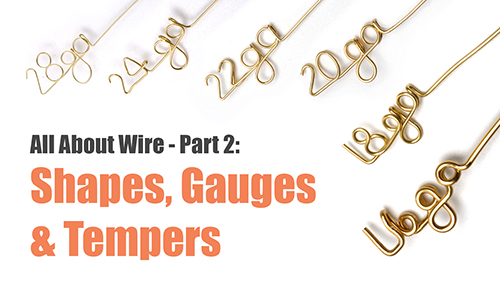
All About Wire - Part 2: Shapes, Gauges & Tempers - Episode 5 - The Tao of Wire

Episode 5: All About Wire, Part 2 – Shapes, Gauges & Tempers

21 Dec 15
dianne
, , , , , , , , , , ,
No Comments

What wire should you choose for your project? In this episode, you’ll learn about the different qualities of wire like shape, gauge and temper, which can impact how your design looks, how easy it is to construct and how well it will wear.
This video is part of the Foundation Skills: Introduction to Wire Jewelery course. Find out more!


Shapes, Gauges & Metals Chart - Episode 5 - The Tao of Wire


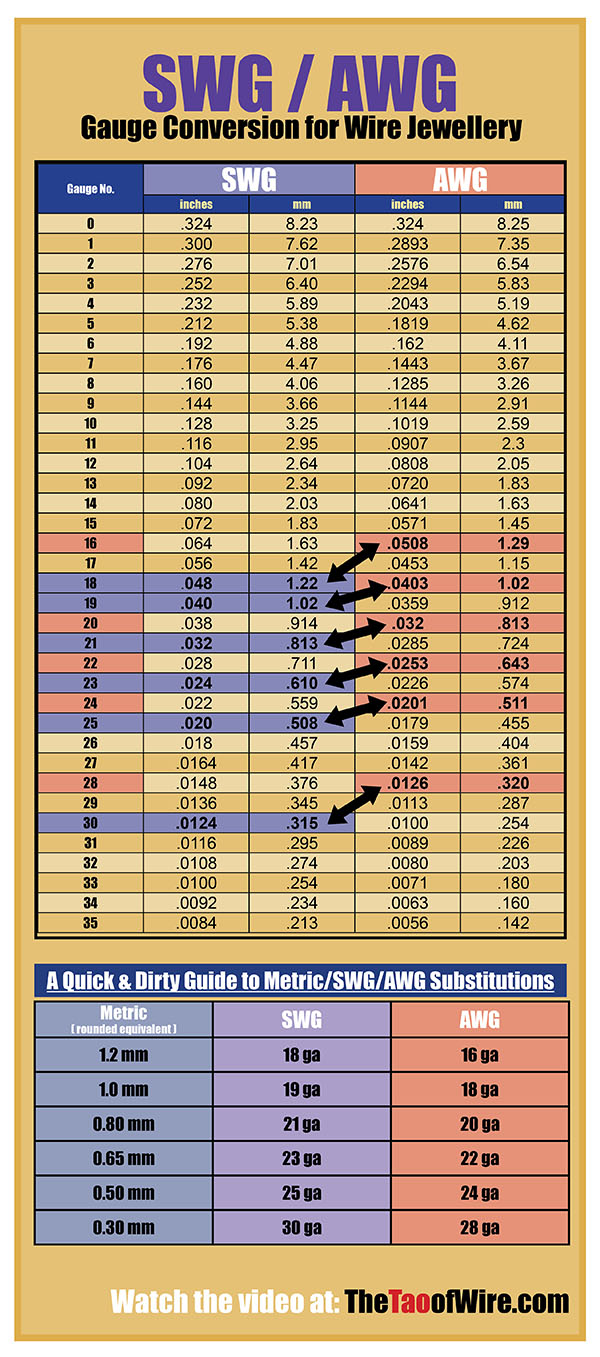
SWG / AWG Gauge Conversion Chart for Wire Jewelry - Episode 5 - The Tao of Wire


All About Wire, Part 1 - Metals - Episode 4 - The Tao of Wire

Episode 4: All About Wire, Part 1 – Metals

03 Dec 15
dianne
, , , , , , , , , , , , , , , , , ,
No Comments

Now that you have your tools, the next step is to choose your wire. In this episode you’ll learn about the different metals that are commonly used in wire jewelry.


This video is part of the Foundation Skills: Introduction to Wire Jewelery course. Find out more!


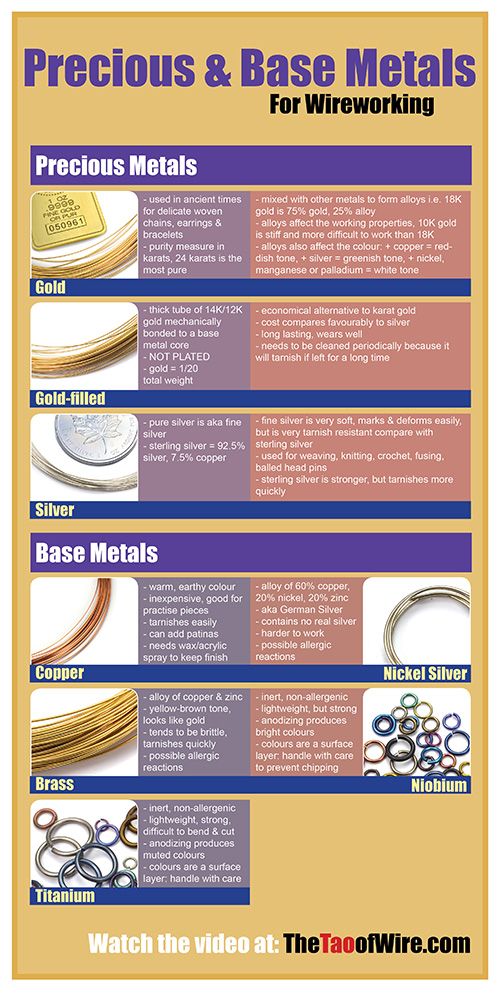
Wire Metals Chart - Episode 4 - The Tao of Wire


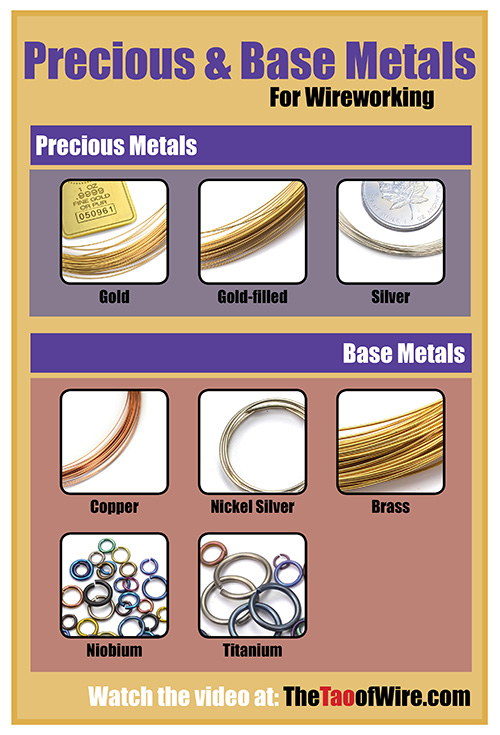
Wire Metals - Mini Chart - Episode 4 - The Tao of Wire

Online Forums, Copying and The Missed Opportunity

09 Oct 15
dianne
, , , , , , , , , ,
No Comments

“If you don’t want your work copied, don’t post it on the Internet.”


I can’t tell you how sick I am of seeing this ignorant statement on forums I’m part of. The people who post this comment claim to be part of a community, but have no clue about their role in sustaining that community.  A lot of the time, they are simply using it to justify acting like complete assholes.  They effectively declare themselves to be parasites. The thing that bugs me the most is that they can’t see how self-defeating their attitude is, and how they lose the opportunity to discover the transformative power of their own creativity.

I wrote an essay many years ago about how one of the outcomes of the creative process is the symbiotic relationship between the artist and the viewer.  Each person plays a vital part in the interaction. There is a continuous mutual exchange and a holistic balance where the artist says “Look at this!” and the viewer says “I see it!”

Public online forums where people publish photos of their work are the 21st century equivalent of an art gallery. It allows people to admire, discuss, and be inspired by what they see. It’s the venue through which the symbiotic relationship is fostered and nurtured. When a work of art is stolen from an art gallery, the loss is felt by the artist, by the viewer and by the whole community. Art galleries have alarms, cameras and guards to prevent theft of the work. The security features in an online forum are more intangeable.  It’s primarily the personal self-restraint, respect and mutual consideration shown by each member that act as the safeguards.

People post to the forums because they’re proud of what they’ve made; they’re excited about their discoveries and accomplishments and they want to share that excitement with an audience. They want to be acknowledged, to be told they’ve done a good job and, where the forum allows it, to be rewarded for their effort through selling their work.

On forums where there are a lot of makers, artists who post work that excites and inspires are frequently asked to share their knowledge through tutorials. For the viewers, the spark of inspiration represents an opportunity to connect with the act of creating and experience that excitement in a new, more profound way.

And it’s where personal self-restraint, respect and mutual consideration come into play.

The artist may be willing to share the knowledge they gained making their designs. If they do, they have every right to set limits. They may decide to give away the information, or they may charge a fee.  Selling a tutorial doesn’t mean that the artist has released ownership of the design.  Buying a tutorial doesn’t entitle you to any rights, only the opportunity to learn. Anything more has to be explicitly granted by the artist who created the original work.  The inherent rights of the artist covered by copyright law are very specific, but that’s a subject for another post.

The artist might not be willing to go beyond just posting the photo of their work, and so declines the request for a tutorial. That can be a disappointment to the person inspired by what they’ve seen.  For some, the desire to learn becomes all consuming, so they decide to try to figure it out for themselves.

No one disputes that we all learn by copying. Making a copy of someone else’s design can be seen as a personal creative challenge and a test of one’s own skill. But not every artist appreciates having their work copied.

Posting in a public forum does NOT mean that the artist is releasing their work to the public domain.  The need for personal self-restraint, respect and mutual consideration is ongoing. This is an often confused and much argued aspect of internet publishing.  The point has to be made that those artists who say they are okay with being copied are making the explicit choice to give up their ownership and rights to their design – it doesn’t mean they never had them in the first place.

When you decide go against the wishes of the artist and make a copy, in no way, shape or form, can you claim that this product of your effort is “yours” in the sense of being presented as “original” design, even if you made small changes.  Understand that the copy is only a starting point on the next part of your creative journey. As part of the symbiotic relationship between the artist and the viewer, you have an obligation to yourself and to the artist who inspired you to move as far beyond the copy as you can. Don’t just make small changes: keep going until the similarities are no longer noticeable. Often you’ll be excited to discover that the ideas and designs you are able to generate become genuinely unique and endless.

That’s why ACKNOWLEDGEMENT and ATTRIBUTION are also important. It’s the conscious act of homage where you remember that without having once played the role of the viewer, you would never have been able to become the artist you’ve discovered you are. It reinforces the foundation of the community and the inspiration that nurtured you. The artist who inspires you said “Look at this!”, and you said “I saw it!”

Keep the copy for yourself as a memento of where you started, wear it with pride. But understand that if you try to claim the copy as your original without acknowledging the source of inspiration, or try to sell it, it’s the equivalent of committing a forgery.  That breaks the links of self-restraint, respect and mutual consideration.  It cuts off the flow of nurturing energy that connects you to your creative source and that sustains the community.

Public forums are a fertile ground for inspiration.  But it’s through APPLYING, EXPANDING, GROWING and MAKING SOMETHING COMPLETELY DIFFERENT that you find the keys to the greatest, lasting treasure:  being able to trust your own inner power as a creative person.  Inspiration may get you excited, but it’s developing the connection to the deepest part of your creative self that keeps you excited.

Simply copying someone else doesn’t go far enough.

Tweaking will only give you a glimmer of what’s possible when you push yourself further.

By making the most committedly honest effort, over time you will find the hidden talent within yourself to create works that stand as wholly, recognizably yours.  You become the artist. You can become the one who inspires.

Don’t underestimate what you’re capable of.

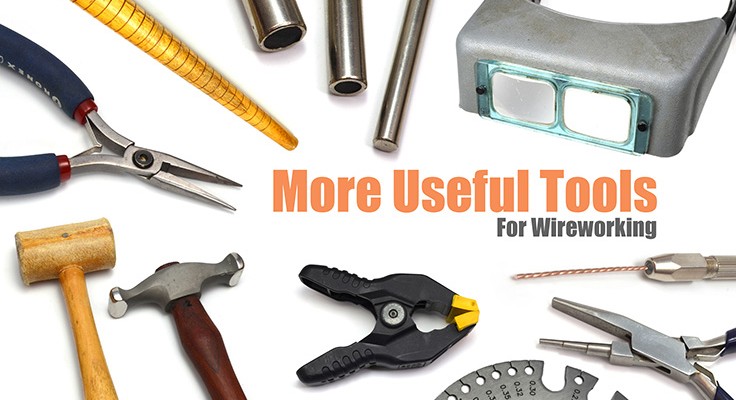
More Useful Tools for Wireworking - Episode 3 - The Tao of Wire

Episode 3: Tools, Part 2 – More Useful Tools for Wireworking

28 Sep 15
dianne
, , , , , , , , , , , , , , , , , , , , , ,
No Comments

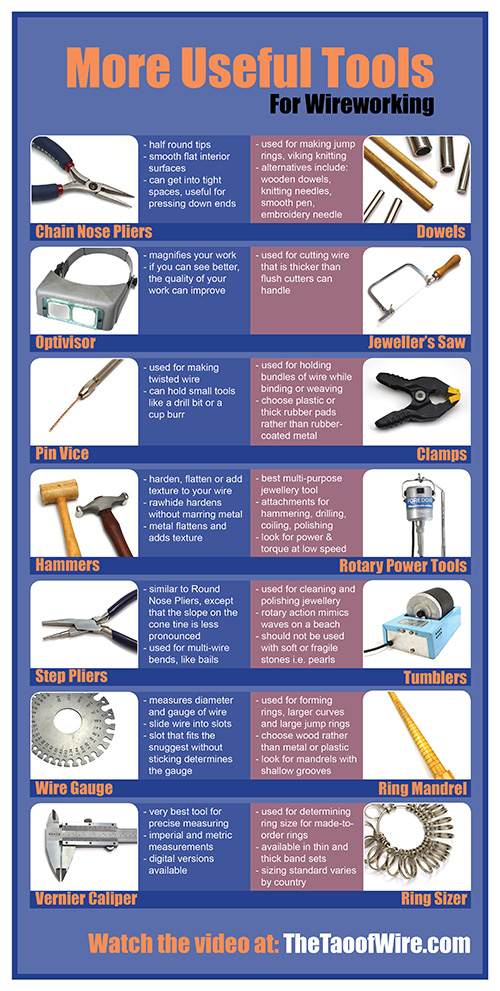
You’ve got the Essential 8 Tools. So what should you add next? In this episode Dianne talks about other tools you can add to your basic kit, as you continue your wire working journey.

This video is part of the Foundation Skills: Introduction to Wire Jewelery course. Find out more!


More Useful Tools List - Episode 3 - The Tao of Wire


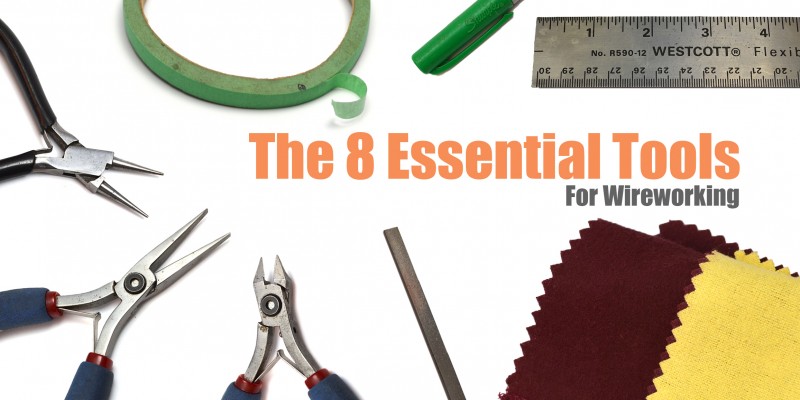
The 8 Essential Tools for Wireworking - Episode 2 - The Tao of Wire

Episode 2: Tools, Part 1 – The 8 Essential Tools for Wireworking

28 Aug 15
dianne
, , , , , , , , , , , , , , ,
No Comments

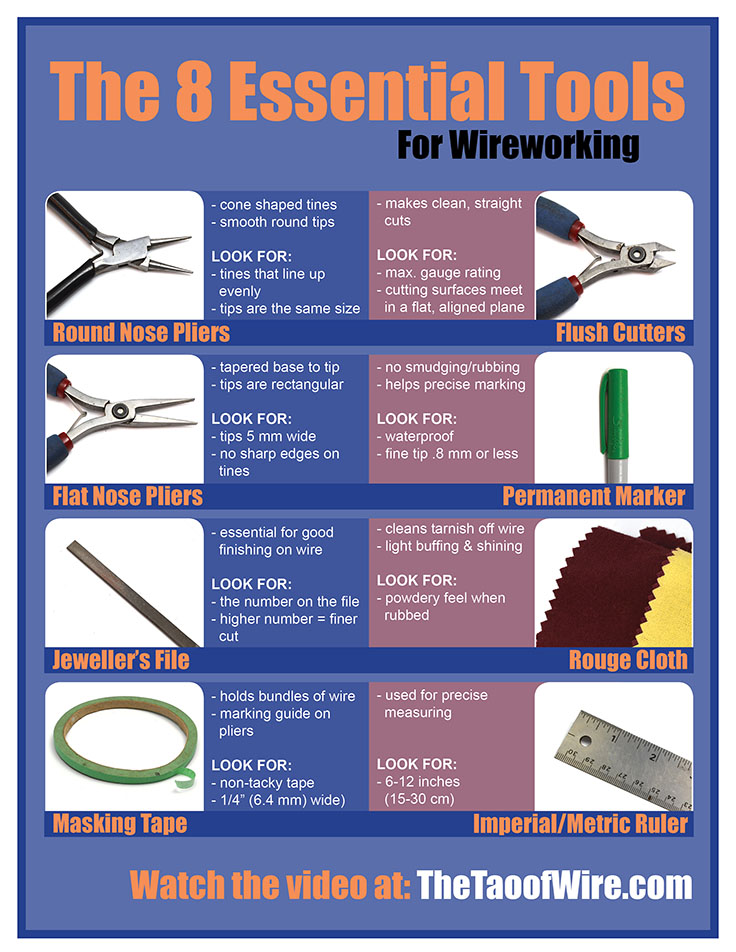
What tools do you need when you’re first getting started making wire jewellery? In this episode Dianne describes the 8 “must have” essential tools you should have.

This video is part of the Foundation Skills: Introduction to Wire Jewelery course. Find out more!


002-8EssentialTools-TheTaoOfWire-Epis2

Are you a Tool Junkie (Quiz) - Video Diary - The Tao of Wire

Video Diary: Are you a Tool Junkie?

28 Aug 15
dianne
, , , , , ,
No Comments

Are you a Tool Junkie? Take this quiz and find out!

Top 10 Metalworking Songs - Video Diary - The Tao of Wire

Video Diary: Top 10 Metalworking Songs

04 May 15
dianne
, , , , ,
No Comments

Just for fun, my Top 10 Metal Songs. These are not necessarily about making stuff out of metal, but mention metal or metal objects in the title or the lyrics.

The songs:
1. Gold Dust Woman – Fleetwood Mac https://youtu.be/VGO9jNHH5Lw
2. You Got the Silver – The Rolling Stones https://youtu.be/_8ijaUa0EZY
3. Brass in Pocket – The Pretenders https://youtu.be/-7Hy7uAb_eU
4. Golden Years – David Bowie https://youtu.be/HRD0ghlFSgk
5. Maxwell’s Silver Hammer – The Beatles https://youtu.be/hWvORNC6U08
6. Hammer to Fall – Queen https://youtu.be/5oSz8Xip_ho
7. Heart of Gold – Neil Young https://youtu.be/FFNqj3RGUuM
8. Platinum – Mike Oldfield https://youtu.be/z-klgIR9lek
9. Copperline – James Taylor https://www.youtube.com/watch?v=rSSqnBfgBsQ
10. Between the Hammer & the Anvil – Judas Priest https://youtu.be/UtdacvZLfb4

Do you agree with my list? Got any others to suggest? Let me know in the comments!

A Favourite Supplier – Rio Grande

03 May 15
dianne
No Comments

Rio Grande is one of my favourite suppliers, and one I readily recommend to my students. Here’s a brief review of why.


May 14, 2015 UPDATE! Hello Rio Grande Facebook Fans! Thanks for visiting!

Review: Beautiful Wire Jewelry by Heidi Boyd, on Craftsy.com

Review: “Beautiful Wirework Jewelry” by Heidi Boyd, on Craftsy

20 Apr 15
dianne
, , ,
No Comments

I’m interested in emphasizing best practices in wirework, so I’m always on the lookout for what other people are teaching in their videos and books. Because so much of it is hit and miss, I’ve decided to start adding reviews, and turn my experience to your advantage.

Craftsy.com is one of the more well-known e-learning sites, with a huge range of craft subjects from quilting to knitting to jewelry making. Instructors are promoted as knowledgeable experts.

Today I’m going to review “Beautiful Wirework Jewelry” by Heidi Boyd, which was recently offered as a free video on Craftsy.

Boyd is described on her Craftsy bio as “an author, designer and dedicated crafter” who has written 15 books and appeared on HGTV and PBS.

“Beautiful Wirework Jewelry” is presented as a beginner class which introduces the viewer to “jewelry lingo” and takes you through three projects, a wire hoop necklace, wrapped drop earrings, and a leather and bead bangle. All three projects are in the “Boho” style, so a bit more freeform than some of the other jewelry offerings on Craftsy.

As with many beginner/crafter/hobby level videos, there is some good, a lot of bad, and some outright wrong info presented.

Heidi Boyd comes across as sweet and soft-spoken, but doesn’t seem entirely comfortable on camera; her speech is a bit stilted and she’s clearly reading from a script.

So, my observations:

Right away in “Basics of Wirework”, at :40, she says: “I’m the author of over a dozen craft books, many on subjects that were brand new to me.”  [emphasis mine]

I never like hearing this from an instructor. Someone who is writing instruction books about subjects that are brand new to them will not have the expertise needed to catch and correct typical newbie mistakes.

This lack of expertise is put on glaring display at 2:28 when she calls what are clearly chain nose pliers “flat nose pliers”, and refers to the round nose pliers as “clever”. (The tools are listed correctly in the materials list pdf, downloadable with the project.)
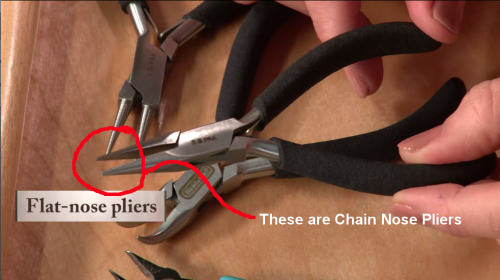
Screenshot from Beautiful Wire Jewelry, video by Heidi Boyd on Craftsy.com

Screenshot from Beautiful Wire Jewelry, video by Heidi Boyd on Craftsy.com

As the video goes on, she continues to stumble with the terminology, referring to a ring mandrel as a “mandr-elle”. Crafter/hobby-style tools are promoted, because these are inexpensive and accessible for a beginner just trying things out. However, the ring mandrel used in the video has no size markings on it, making it a virtually useless tool that you shouldn’t waste your money on.

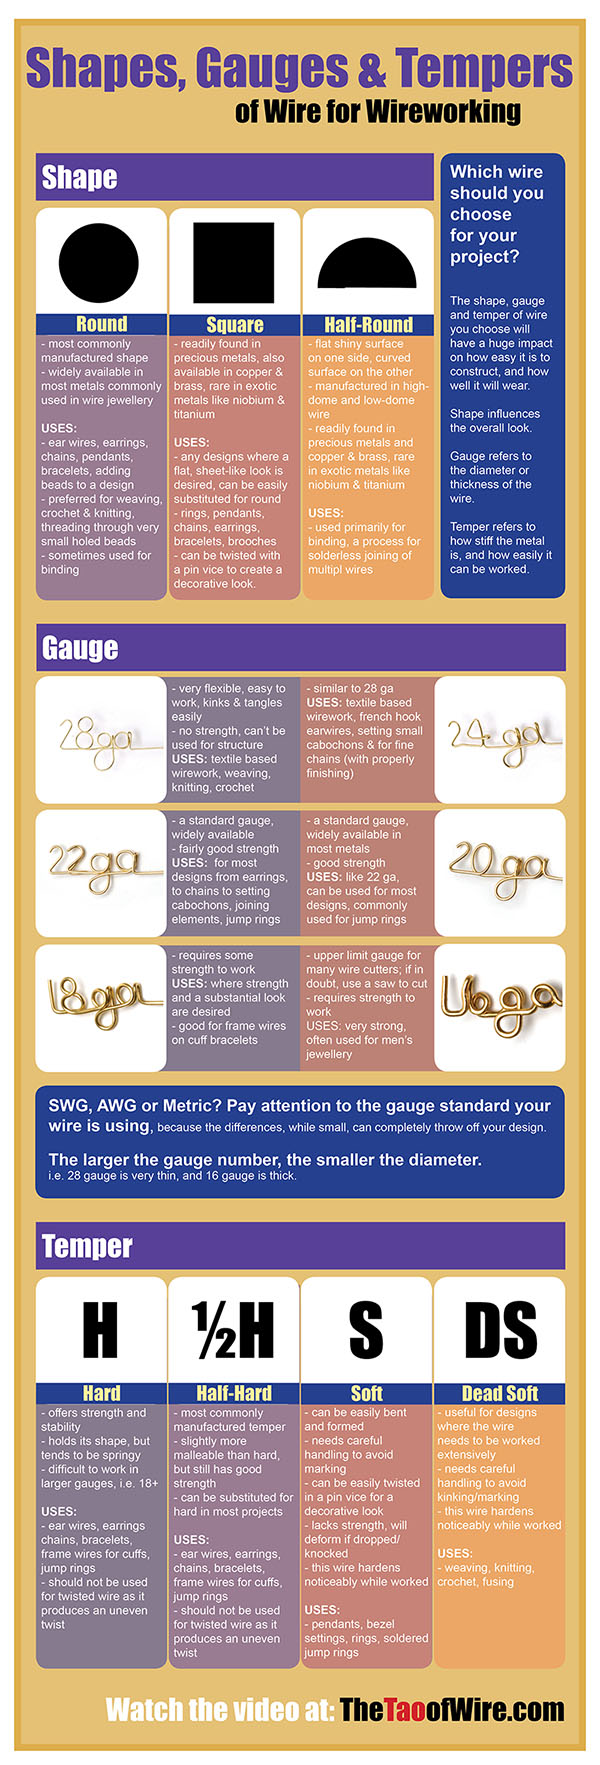
Likewise, the use of plated copper (aka Artistic Wire) and brass wire is promoted as an affordable alternative to precious metals. For practice pieces, these types of wire are great for getting the feel of how the metal handles, but there are longer term durability issues that are not mentioned at all. Boyd does a decent job of explaining the basics of the various wire gauges and their uses.

In the next lesson, “Wire Hoop Necklace”, again she immediately gives her viewers bad advice by telling them to work directly from the spool. The reason why you should NOT do this becomes very clear about 30 seconds later when her spool starts to unravel itself and becomes a tangled mess.

The first hoop looks very sloppy because there are multiple beads pushing the loops in all different directions. Unfortunately “Boho style” in crafter-speak too often means that clumsy wire handling becomes a feature, not a bug.

It becomes hugely irritating, then, to hear this instructor make suggestions about how to make the wraps look more “professional”, when demonstrating clean technique in the first place would be just as easy and more effective.

Similarly, trimming off the ends and pressing them down so they don’t poke you is a absolute necessity in wirework.  Cutting them off on the “outside” of the hoops so they can catch on your sweater can hardly be considered getting a “professional” look. The viewer should give up on any notion of achieving professionalism later in the video when any attempt at trimming the ends off properly is abandoned.

I’ve used the tool promoted in this video for making jump rings, and for a crafter-level tool, it can achieve fairly decent results. There’s a hole for threading and locking down the wire, and the tool can be spun to make a coil, but Boyd doesn’t demonstrate how to use it properly. In fact, I wondered why she didn’t just use a dowel. Her coil ends up loose and messy.

Cutting jump rings with the flush cutters, she demonstrates bad technique by not trimming both ends of the wire on the “finished” ring.  As a result, there is a flush cut on one side and a beveled cut on the other side. This is a complete fail, and a bad habit to learn. While she does give correct info on how to open and close jump rings, the poor cuts result in rings that will never close properly.  Jump rings need to have two flush ends that can butt up against each other cleanly. The best way to achieve clean cuts is with a jeweller’s saw or a jump ring cutter. It is possible, *in a pinch* to use flush cutters to cut cleans ends, but *only* if you don’t need your rings to be a consistent size, and then only when making a single or a few (i.e. less than 5). Using a flush cutter should never be a first choice.

Lessons 4 and 5 “Wrapped Drop Earrings” and “Leather and Bead Bangle” continue in much the same vein.  The inconsistent nomenclature continues, as Boyd refers to refers to the “flat nose pliers”, which are actually chain nose pliers, as “needle-nose pliers”. Later she refers to them again as “flat nose pliers.” For a video that claims to teach proper lingo, this is going to leave newbies completely confused.

Working off the spool for the earwires, using the ring mandrel with no sizing, she doesn’t mark where she’s making her hooks.  Instead, she makes the second earwire on top of the first before removing both, but admits “This is easier said than done – things shift around a little bit.

She continues to wrestle and struggle with her tangled mess of wire, admitting finally “This can be awkward working on this wire.” Working off the spool tends to do that.

Good info about hiding the end of the wire that covers the face of the bead is contradicted by bad technique at the top of the bead, where she simply trims off the wire, doesn’t secure it, finish it or press it flat – it’s left sticking out!

In the bangle video, she stresses the importance of working safely, but doesn’t trim flush or file the ends of her wire. There is no information provided on how much 26 ga wire is needed for the beading wire.  Shockingly, she comments “You want to try to space the beads consistently, but this is a handmade item, so…” This insinuates that poor construction is okay because it’s “handmade”. That comment epitomizes exactly why wireworking can be seen as having a bad reputation in the metalworking community. HANDMADE and WELL MADE are NOT mutually exclusive!

The finished bracelet looks flimsy – one good yank and it will deform.

While the overall video quality, sound and editing of “Beautiful Wire Jewelry” are good, I have to be blunt about the content: this video teaches a whole host of bad habits. There are obvious mistakes, slack attention to details, and Boyd recommends handling the wire in a way that sets the students up for no end of frustration and failure. These pieces can truly only be described as disposable jewelry. Wear ’em once, and be prepared to lose them or toss them. If you’re looking to make jewelry you can be proud of and that will last, avoid following the instructions offered in “Beautiful Wirework Jewelry”.

THE VERDICT: Not enough redeeming info to make up for the mountain of bad techniques. Run Away! Run Away!


NB – To learn how to properly make a single or *very* small number of jump rings using a flush cutter, how to cut jump rings with a jeweller’s saw, and how to cut jump rings with a jump ring cutter and a Foredom, please visit the video library here on The Tao of Wire.
In The Studio – The Standard Form Ring (Time Lapse)

07 Jan 15
dianne
No Comments

Just for fun – a time-lapse video of me constructing a Standard Form Ring. The ring – also known as the “Pharaoh Ring” was originally designed by Thomas Vincent Phelan, who patented it in 1948. It came into the public domain in 1962 quickly became one of the “classic” pieces of wirework jewellery. Follow along as I build!

If you’d like to purchase the instructions for this ring, they are available here.